
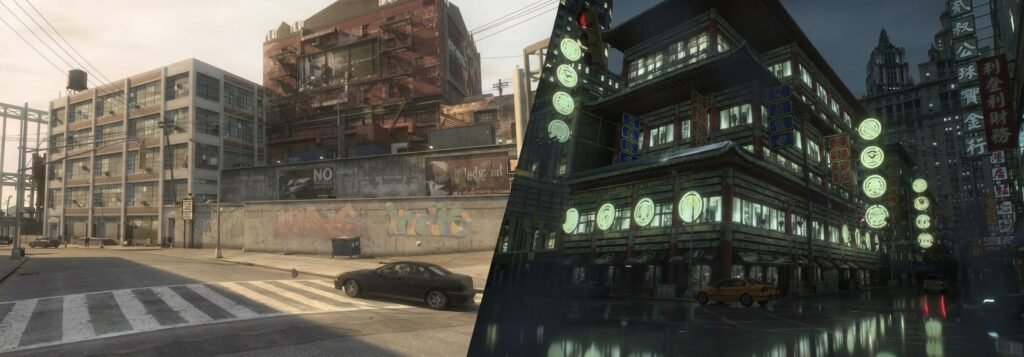
Look, I’ve spent countless hours modding GTA IV, and honestly? The RTX Remix path tracing mod is a total game-changer for this 2008 classic. If you’re ready to experience Niko Bellic’s story with mind-blowing realistic lighting and reflections, you’re in the right place.
Transform GTA IV with RTX path tracing mods in 2026. Complete guide covering ray tracing installation, performance optimization, DXVK fixes, FusionFix setup, and troubleshooting runtime errors for stunning realistic graphics.
This comprehensive GTA 4 RTX Remix tutorial covers everything from download links to fixing those annoying runtime errors that’ll inevitably pop up. Let’s dive in.
What is GTA IV RTX Remix Technology
The GTA 4 path tracing mod uses NVIDIA’s cutting-edge RTX Remix technology to completely overhaul the game’s visual fidelity. Unlike traditional ray tracing that calculates a few light bounces, path tracing follows multiple random light paths for photorealistic results.
Developed by Xoxor4d (who also worked on COD4 RTX projects), this compatibility mod maintains the original art style while adding stunning lighting improvements. The latest 2026 version supports GTA IV Complete Edition patch 1.2.0.59 with enhanced 4K texture support.
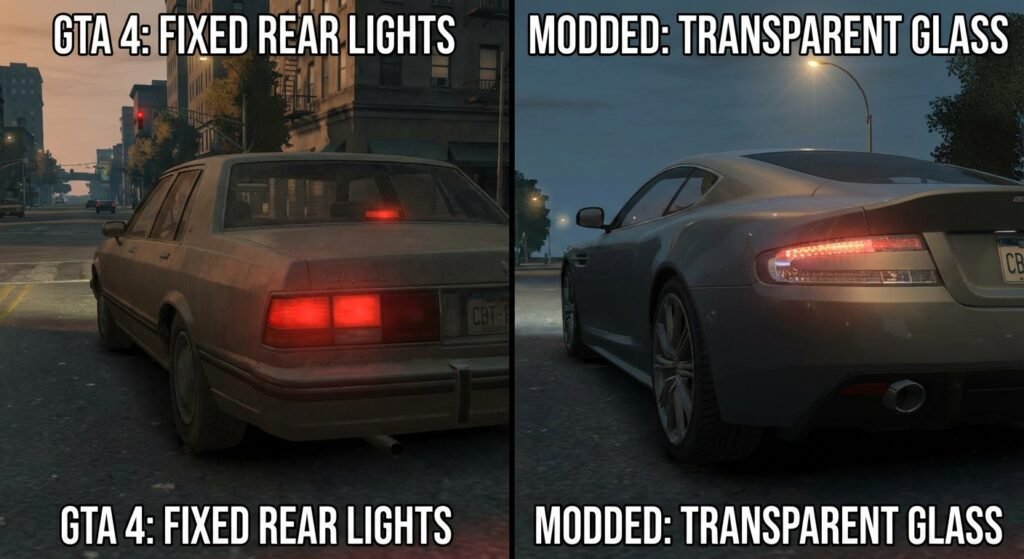
The December 2025 update fixed several critical issues including translucent texture problems, vehicle rear light blending issues, and added anti-culling options for interior objects. Vehicle glass now appears transparent by default, and police car sirens display real spinning lights.
Just be warned—you’ll need serious hardware to run this smoothly. We’re talking RTX 4070 minimum, though an RTX 5090 is what you really want for that buttery experience.
System Requirements for GTA IV RTX Edition Mod
Before diving into GTA 4 RTX mod download, let’s talk specs. NVIDIA officially recommends specific hardware for RTX Remix mods:
| Component | Minimum | Recommended |
|---|---|---|
| GPU | Any RTX GPU | RTX 4070 or higher |
| VRAM | 8GB | 12GB+ |
| CPU | Intel i5 / Ryzen 5 | Intel i7 13700K / Ryzen 7 7700X |
| RAM | 16GB | 32GB |
| Storage | HDD | 10GB NVME SSD |
| OS | Windows 10 | Windows 11 |
GTA 4 RTX Remix performance varies significantly based on your hardware. At native 4K, expect around 21-23 FPS even on an RTX 5090. With DLSS 4 Quality mode, you’ll hit 34-40 FPS, and Frame Generation pushes it to 64-76 FPS. Multi-Frame Generation can reach 100-120 FPS, which makes the game actually playable at higher resolutions.

The performance hit comes from RTX Remix’s overhead and CPU bottlenecks caused by the amount of detailed meshes the game renders. This isn’t entirely due to path tracing—the interception of draw calls adds computational load.
GTA IV RTX Edition Mod Install
Step-by-Step Installation Guide GTA IV RTX Edition Mod
Here’s how to properly install the GTA 4 RTX Remix mod without breaking your game:
1. Download Required Files
- Visit the official GitHub repository for the compatibility mod
- Download NVIDIA RTX Remix from the NVIDIA app
- Get the latest FusionFix version (3.5.0 or higher recommended)
2. Extract and Prepare
Download the archive and extract everything to one folder. This is important—scattered files will cause installation failures.
3. Run the Installer
Execute “GTAIV-Remix-CompMod-Installer.exe” with administrator privileges (the latest version requests UAC automatically). A window opens where you specify the location of GTAIV.exe on your hard drive.
4. Install Modified FusionFix
The installer offers a specially modified FusionFix version. Accept this—the standard FusionFix has compatibility issues with RTX Remix. If you already have regular FusionFix installed, the custom fork replaces it automatically.
5. Launch Through RTX Remix
- Open RTX Remix app
- Select “OPEN” and choose the USDA file from the mod folder
- Launch GTA IV through RTX Remix interface
The installation process now includes Ultimate ASI Loader to load the compatibility mod itself.
GTA 4 RTX Remix Textures – HD Enhancements
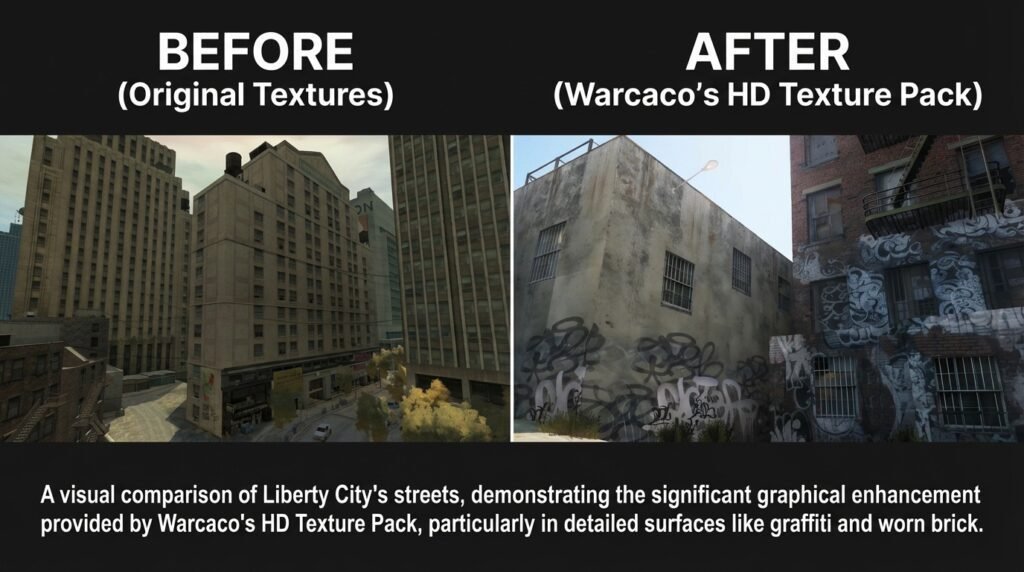
Warcaco’s HD Texture Pack
The first GTA 4 RTX Remix textures pack was released by modder Warcaco in December 2025. This 1.2GB pack dramatically improves roads, pavements, vehicles, and buildings throughout Liberty City.
Installation Method:
- Download from DSO Gaming’s link
- Extract to your desktop
- Copy everything inside the package folder
- Paste into “GTAIV/rtx-remix/mods/gta4rtx” folder
You don’t actually need the NVIDIA RTX Remix app to install texture packs—just drop files in the correct directory and they’ll load automatically.
The Wil’s 9GB City Texture Pack
For even more comprehensive texture improvements, The Wil’s AI-upscaled pack replaces all city textures with HD versions. Using 4X, 2X, and selective 1X upscaling, it maintains the original art style while looking absolutely insane.
This pack is compatible with FusionFix, letting you combine them for the ultimate remaster experience. Download comes in three parts totaling 9GB.
Critical Performance Fix Mods
GTA4 DXVK – The Performance Miracle
This is probably the single most important mod you’ll install, period. DXVK for GTA IV translates DirectX 9 calls to Vulkan, dramatically reducing stuttering and improving GPU utilization.
Key benefits I’ve personally noticed:
- Eliminates the annoying 512MB VRAM bug
- Reduces stuttering after first launch
- Better overall GPU utilization
- Compatible with ENB and ReShade mods
Download from Nexus Mods and extract the d3d9.dll file to your game directory. The latest version 2.4 includes frame latency improvements and triple buffering support.
For ENB users, rename d3d9.dll to dxvk.dll and modify your enbseries.ini file with ProxyLibrary=dxvk.dll.
FusionFix – Essential Graphics Overhaul
FusionFix mod addresses most graphical and gameplay issues while introducing new graphics options. It fixes mouse input delay, improves frame pacing, and adds widescreen/ultrawide support.
The mod now includes Console Vegetation options and replaces PCSS with CHS for better shadow quality. Honestly, I can’t imagine playing without this anymore.
ZolikaPatch for Downgraded Versions
If you’re running a downgraded GTA IV version for mod compatibility, ZolikaPatch is essential. It improves multiplayer experience and fixes version-specific bugs, though you shouldn’t install it on Complete Edition.
GTA 4 RTX Remix Runtime Error – Troubleshooting Guide
Common Runtime Errors and Fixes
“RTX Remix Runtime Error” on Scene Capture
This frequently occurs when trying to capture scenes for editing. The error often relates to FusionFix compatibility issues.
Solution:
- Ensure you’re using the modified FusionFix fork that comes with the RTX Remix installer
- Update to the latest Remix runtime (December 2025 or newer)
- Verify game files through Steam if using the Complete Edition
Fatal Error SHFX20
This error appears specifically with Steam’s latest GTA IV version when RTX Remix and standard FusionFix are both installed.
Solution:
Remove existing mods, downgrade the game using a proper downgrader, then install RTX Remix first without FusionFix, and finally add the modified FusionFix version.
Game Crashes After Loading Screen
Alt+X menu works, you can select between normal GTA and DLC, but the game crashes when loading.
Solution:
- Check for conflicting ASI mods
- Ensure Ultimate ASI Loader is the version included with RTX Remix installer
- Disable any ENB presets temporarily to test compatibility
Graphics Settings Greyed Out
Unable to adjust sunshafts, texture quality, or water quality in-game.
Solution:
This is actually normal behavior with RTX Remix—many vanilla settings are overridden by the path tracing renderer. Adjust visual settings through the RTX Remix F4 menu instead, which now includes a WIP tab for experimental options.
GTA 4 RTX Remix Uninstall – Clean Removal Process
How to Safely Remove RTX Remix
If you need to uninstall GTA 4 RTX Remix, follow this process to avoid corrupting your game:
1. Remove Mod Files
Delete d3d9.dll and a_gta4-rtx.asi from your game directory. These are the core compatibility mod files.
2. Restore Original FusionFix
If you used the custom FusionFix fork, re-install the official FusionFix mod.
3. Remove RTX Remix Folders
Delete the “rtx-remix” folder from your GTAIV directory, which contains all the path tracing data and texture packs.
4. Verify Game Files
Use Steam’s “Verify Integrity of Game Cache” feature to restore any modified game files. This method works regardless of how many files were changed.
5. Clean Installation (If Needed)
For stubborn issues, delete the entire game folder and reinstall. Your save files are stored separately and won’t be affected if they’re in the default Documents location.
Additional Must-Have Fix Mods
Various Fixes Mod
This comprehensive mod tackles map issues and texture problems throughout Liberty City. Download through Fusion Overloader and install the update folder to your game directory.
Console Visuals – The Complete Edition
Brings console-accurate vegetation and visual effects to PC. The latest version separates components, so download Console.Vegetation.zip from GitHub and extract the update folder.
Radio Restoration
Restores all original radio stations that Rockstar had to remove due to licensing issues. Grab it from downgraders.rockstarvision.com. This is particularly important for the authentic Liberty City atmosphere.
Optimization Tips for Maximum Performance
Here’s what actually works based on my testing with GTA 4 RTX Remix performance:
- Enable DLSS Quality mode minimum for path tracing
- Use Frame Generation to double your framerate—Multi-Frame Gen can reach 100+ FPS
- Configure DXVK with d3d9.maxFrameLatency = 1 for lower input latency
- Set d3d9.numBackBuffers = 3 for triple buffering
- Install games on NVME SSD to reduce loading stutter and texture streaming issues
- Close background applications—path tracing is seriously demanding on system resources
- Use the F4 menu in-game to adjust path tracing intensity and quality settings
The CPU bottleneck is real with this mod. Even high-end processors struggle with the detailed mesh rendering. Consider lowering density settings if you’re experiencing constant stuttering.
Advanced Troubleshooting Tips
Rockstar Launcher verification failures: Sometimes it’ll close the game randomly. Just restart it a few times—it’s annoying but eventually works.
Missing textures after updates: Update to DXVK 2.4 or later, which has better texture stability.
Hair alpha transparency issues: Still being worked on by the developer, but doesn’t break the game. The latest runtime includes improvements for translucent surfaces.
White emissive surfaces: The December update fixed most surfaces missing vertex colors. If you still see these, ensure you have the latest compatibility mod version.
Interior objects disappearing: Enable the new anti-cull option for interior objects—Niko’s bed lamp should no longer vanish.