
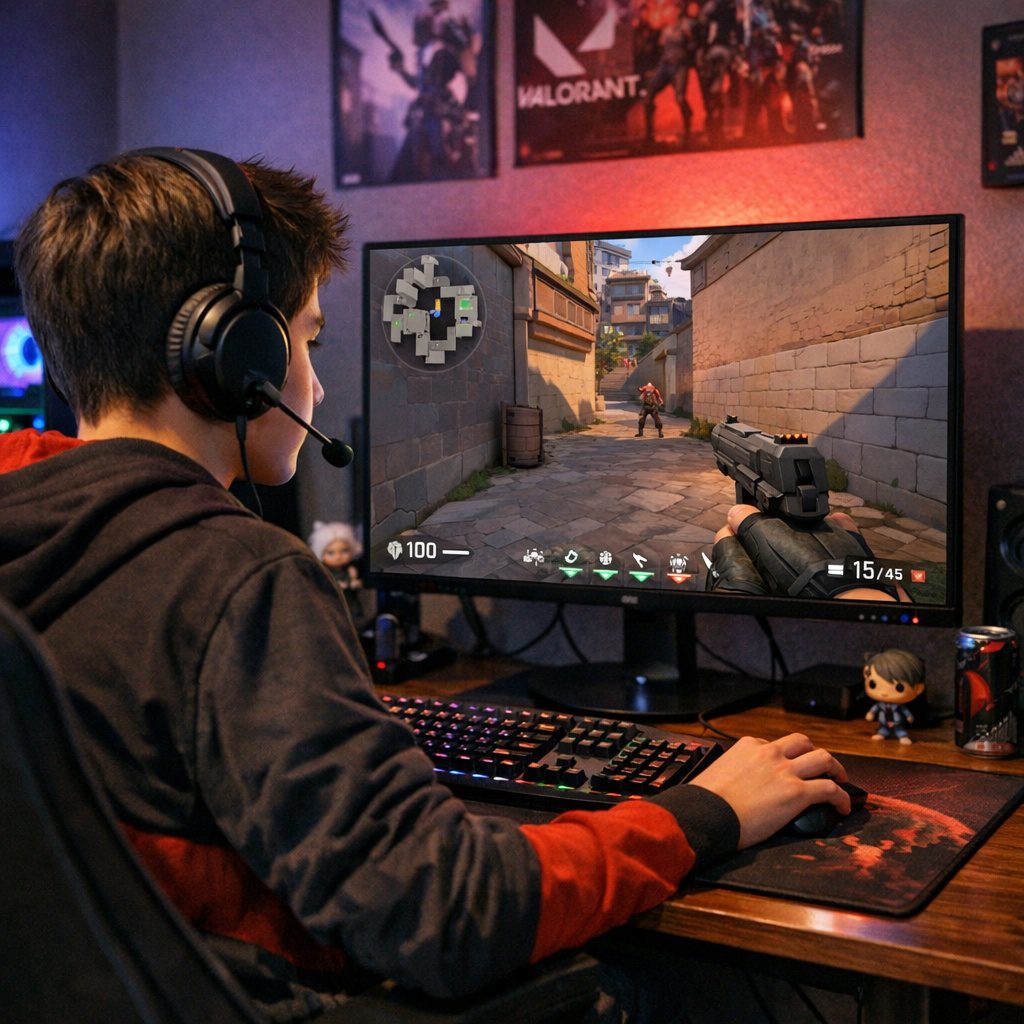
If you want to climb the ranks in Valorant, your raw aim and game sense will only take you so far. In highly competitive tactical FPS games, every millisecond counts, which is exactly why optimizing your Valorant pro settings is a non-negotiable step for climbing the ladder.
Whether you’re grinding out of Silver or pushing for Radiant, establishing FPS stability, minimizing input lag, and maximizing enemy visibility are crucial. We’ve seen this time and time again at major events like Valorant Champions: the world’s best players don’t play on cinematic, ultra-high graphics. They strip the game down to its bare essentials to guarantee maximum performance.
This 2026 guide is your ultimate breakdown of the best Valorant graphics settings, complete with FPS boost tweaks, optimal mouse configurations, and hidden system tricks to help you build the ultimate competitive setup.
Why Pro Settings Matter in Valorant
When you watch a professional Valorant match, the gameplay looks incredibly smooth. This isn’t just because they have top-tier PCs; it’s because their settings are hyper-optimized.
- Competitive advantage through optimized visibility: Stripping away visual clutter makes enemy character models pop out against the map geometry.
- Lower latency = faster reaction time: Lower settings reduce system render latency. When you see an enemy, your PC processes that information faster, giving you the edge in a 50/50 duel.
- Consistent FPS improves aim precision: Frame drops ruin flick shots. A consistent 240+ FPS is far more valuable than a fluctuating 400 FPS.
- Reduced visual clutter: Disabling unnecessary effects prevents distractions during chaotic site executes.
Riot Games designed Valorant with an optimization-first philosophy, allowing the game to run on older hardware. However, pros still prioritize raw performance over visuals, pushing the engine to deliver the lowest possible input delay.
Best Video Settings for Maximum FPS (Pro Setup Guide)
Display Settings (Recommended by Pros)
To get the absolute best Valorant FPS boost, your display settings need to be locked in correctly before you touch the graphics quality.
- Display Mode: Fullscreen (Crucial for minimizing input lag; never use Windowed Fullscreen)
- Resolution: 1920×1080
- Aspect Ratio: 16:9
- Limit FPS: Off (Unless your PC overheats, let your frames uncap for the lowest input delay. Only limit FPS in menus/background)
- NVIDIA Reflex Low Latency: On + Boost (Forces your GPU to stay at maximum clock speeds when CPU-bound)
Best Valorant resolution for FPS / Does stretched resolution help in Valorant?
Unlike CS2, Valorant’s engine locks the field of view (FOV). If you play on a stretched resolution (like 1280×960), it only stretches the UI and crosshair, not the enemy player models. While lowering resolution will grant a massive FPS boost for lower-end PCs, playing at native 1920×1080 is highly recommended for maximum visual clarity.
Graphics Quality Settings (FPS Optimized)
This is the recommended pro-level setup to eliminate distractions and maximize frame rates.
- Material Quality: Low
- Texture Quality: Low or Medium (Medium can sometimes make enemy outlines slightly sharper without costing FPS)
- Detail Quality: Low
- UI Quality: Low
- Vignette: Off
- V-Sync: Off (V-Sync introduces massive input lag. Always keep this off)
- Anti-Aliasing: None or MSAA 2x (None for max FPS; MSAA 2x if jagged edges distract you)
- Anisotropic Filtering: 1x or 2x
- Improve Clarity: On
- Experimental Sharpening: Off
- Bloom: Off
- Distortion: Off
- Cast Shadows: Off
Why do most pros disable shadows?
The “Cast Shadows” setting only applies to shadows cast by your own player model and weapon, not enemy shadows. Turning it off saves GPU resources. Meanwhile, enabling “Improve Clarity” significantly boosts contrast, making it much easier to spot enemies peeking from dark corners.
Best Mouse & Sensitivity Settings (Pro-Level Aim Control)
DPI & eDPI Explained
- What is DPI? Dots Per Inch. It’s the hardware sensitivity of your mouse.
- What is eDPI? Effective Dots Per Inch (DPI x In-game Sensitivity). This is the true metric used to compare sensitivities across different players.
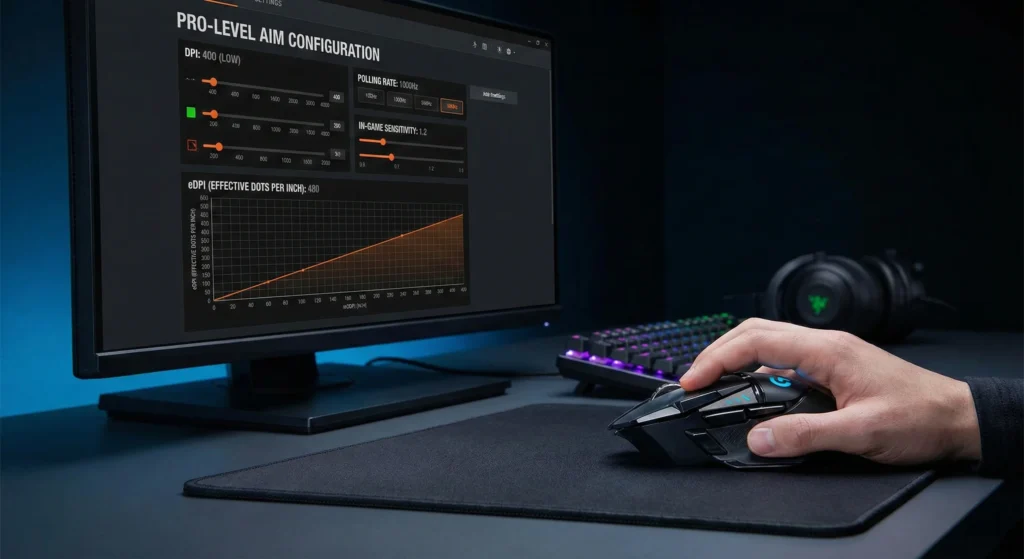
The ideal eDPI range used by the vast majority of pros sits between 200 and 400.
Pro Player Sensitivity Examples:
- Players on top teams like Sentinels often hover around 0.3 to 0.4 in-game sensitivity at 800 DPI (240–320 eDPI).
- Aggressive duelists from teams like Fnatic might play slightly higher (around 300-350 eDPI) for faster 180-degree turns, but they rarely exceed 400 eDPI. Lower sensitivity allows for micro-adjustments and consistent headshots.
Raw Input Buffer
- Should you enable it? Yes.
- Why? Enabling Raw Input Buffer allows Valorant to read your mouse movements directly from the hardware, bypassing Windows processing. This improves tracking stability, especially for gaming mice with polling rates of 1000Hz, 4000Hz, or 8000Hz.
Best Crosshair Settings Used by Pros
Crosshair Style
- Static vs Dynamic: Almost all pros use Static crosshairs. Dynamic crosshairs (which expand when moving or firing) are visually distracting. You should inherently know your movement error timings without needing the crosshair to tell you.
- Recommended Size: Keep it small. A simple dot, a small cross (1-4-2-2), or a tight box is ideal for clicking heads at long range.
Crosshair Color for Visibility
- Cyan
- Green
- White
Why do pros prefer Cyan?
Cyan sits on the opposite end of the color spectrum from the warm, earthy tones (reds, browns, oranges) used heavily on Valorant maps like Ascent, Bind, and Sunset. Because of this high contrast advantage, a cyan crosshair will never blend into the background.
Best Minimap & Radar Settings
Your minimap gives you free wallhacks if you know how to read it. Optimize it so you can see the entire map at a glance.
- Rotate: Rotate
- Fixed Orientation: Based on Side (Personal preference, but ‘Rotate’ is standard)
- Keep Player Centered: Off
- Minimap Size: 1.1 – 1.2
- Zoom: 0.9 – 1.0
- Minimap Vision Cones: On
Why awareness > aesthetics: Turning “Keep Player Centered” Off and zooming out ensures you can always see what is happening on the opposite site. Pros rely on radar info efficiently to check teammate sightlines, spot enemy utility, and track spotted enemies without needing verbal callouts.
Audio Settings for Competitive Advantage
- Master Volume: High enough to hear footsteps clearly, but not so loud it damages your hearing.
- Enable HRTF: On
- Voice-Over Ducking: On
- Music Volume: 0 (Disable completely)
The HRTF Advantage:
HRTF (Head-Related Transfer Function) provides a massive 3D audio advantage. It simulates surround sound, allowing you to accurately pinpoint whether a footstep or ability sound is coming from above, below, or behind you.
Windows & System Performance Tweaks (Hidden FPS Boost Tips)
Optimizing your PC outside of the game is just as important as in-game settings.
NVIDIA Control Panel Settings
Right-click your desktop, open the NVIDIA Control Panel, and navigate to “Manage 3D Settings”. Adjust these for Valorant:
- Low Latency Mode: Ultra
- Power Management Mode: Prefer Maximum Performance
- Texture Filtering – Quality: High Performance
- Threaded Optimization: On
Windows Optimization
- Game Mode: On (Settings > Gaming > Game Mode)
- Disable Xbox Game Bar: Turn this off as it frequently runs in the background and causes micro-stutters.
- High Performance Power Plan: Go to Control Panel > Power Options and select “High Performance” to uncap your CPU.
- Update GPU Drivers: Always perform a clean install of your NVIDIA or AMD drivers.
Note on OS Performance: Windows 11 handles modern CPU scheduling (especially for Intel P/E cores) slightly better than Windows 10, but both require debloating background apps to maximize Valorant performance tweaks.
Pro Player Settings Comparison Table
(Disclaimer: Settings are purely personal preference. Use these as a baseline, not a strict rule.)
| Player | DPI | In-Game Sens | eDPI | Resolution | Notes |
| TenZ | 800 | 0.30 | 240 | 1920×1080 | Known to experiment, but generally hovers around this low-sens range for pinpoint accuracy. |
| Derke | 400 | 0.74 | 296 | 1920×1080 | Excellent entry-fragging sensitivity, balancing flick speed with tracking. |
| yay | 800 | 0.27 | 216 | 1920×1080 | Extremely low sensitivity, heavily reliant on crosshair placement and arm aiming. |
Common Mistakes Players Make
- Copying pro settings blindly: TenZ’s sensitivity works for his exact mousepad, grip style, and arm length. It might not work for you.
- Using too high sensitivity: If your eDPI is over 600, you are making the game mechanically harder for yourself.
- Playing on WiFi: Packet loss is the enemy of hit registration. Always use an Ethernet cable.
- Ignoring monitor refresh rate: Buying a 144Hz monitor and forgetting to change the Windows display settings from 60Hz to 144Hz is a classic mistake.
- Overusing visual effects: Turning on Bloom and high material quality makes the game look pretty, but adds input delay and visual noise.
Advanced Competitive Tweaks (For Serious Ranked Climbers)
- Disable Fullscreen Optimization: Right-click the Valorant shortcut > Properties > Compatibility > check “Disable fullscreen optimizations”.
- Set Valorant to High Priority: Open Task Manager while the game is running > Details tab > right-click
VALORANT-Win64-Shipping.exe> Set Priority > High. - Adjust Monitor Overdrive Settings: Dig into your physical monitor’s OSD (On-Screen Display) menu and set the response time/overdrive to “Fast” or “Extreme” to reduce ghosting.
- Upgrade to High Refresh Rates: Tournament-level hardware standards for the Valorant Champions Tour require 240Hz, 360Hz, or even 500Hz monitors. If you are serious about climbing, a 144Hz or 240Hz monitor is arguably the most important hardware upgrade you can make.
How to Find Your Perfect Valorant Settings
- Step-by-step sensitivity test routine: Go into the Practice Range, set bots to “Eliminate 50”, and try tracking their heads while strafing. If your crosshair lags behind, raise your sens slightly. If it overshoots, lower it.
- Aim training suggestions: Use AimLabs or KovaaK’s. Play tracking scenarios (like Sphere Track) and clicking scenarios (like Gridshot) to build mouse control.
- Practice Range drills: Practice “counter-strafing” and deadzoning on the hard bots before queuing up.
- Deathmatch warmups: Play 2-3 Deathmatches focusing only on crosshair placement and burst-firing, not winning the lobby.
FAQ Section
Q1: What settings do most Valorant pros use?
Most pros use 1920×1080 resolution, Fullscreen mode, and all graphics settings set to Low/Off (except for “Improve Clarity” and “Multithreaded Rendering”) to maximize FPS and minimize visual clutter.
Q2: What is the best sensitivity for Valorant?
The best sensitivity falls between an eDPI of 200 and 400. This low-sensitivity range allows for precise micro-adjustments needed for headshots while still allowing players to comfortably clear corners.
Q3: Does lower resolution increase FPS in Valorant?
Yes, lowering your resolution (e.g., to 1280×720) will increase your FPS, especially if your PC has a weaker GPU. However, it will make the game look blurrier, which can impact visibility at long ranges.
Q4: Should I use stretched resolution in Valorant?
Unlike CS:GO, stretched resolution in Valorant does not make enemy character models wider. It only stretches the UI. Therefore, playing on native 1920×1080 is highly recommended for the best clarity.
Q5: How do I increase FPS in Valorant?
Turn all in-game graphics to Low, turn off V-Sync, enable NVIDIA Reflex, set Windows Power Plan to High Performance, and disable background apps like Xbox Game Bar or Discord hardware acceleration.